Modern and Simple Mehndi Design Ideas for Every Occasion
Key Takeaways
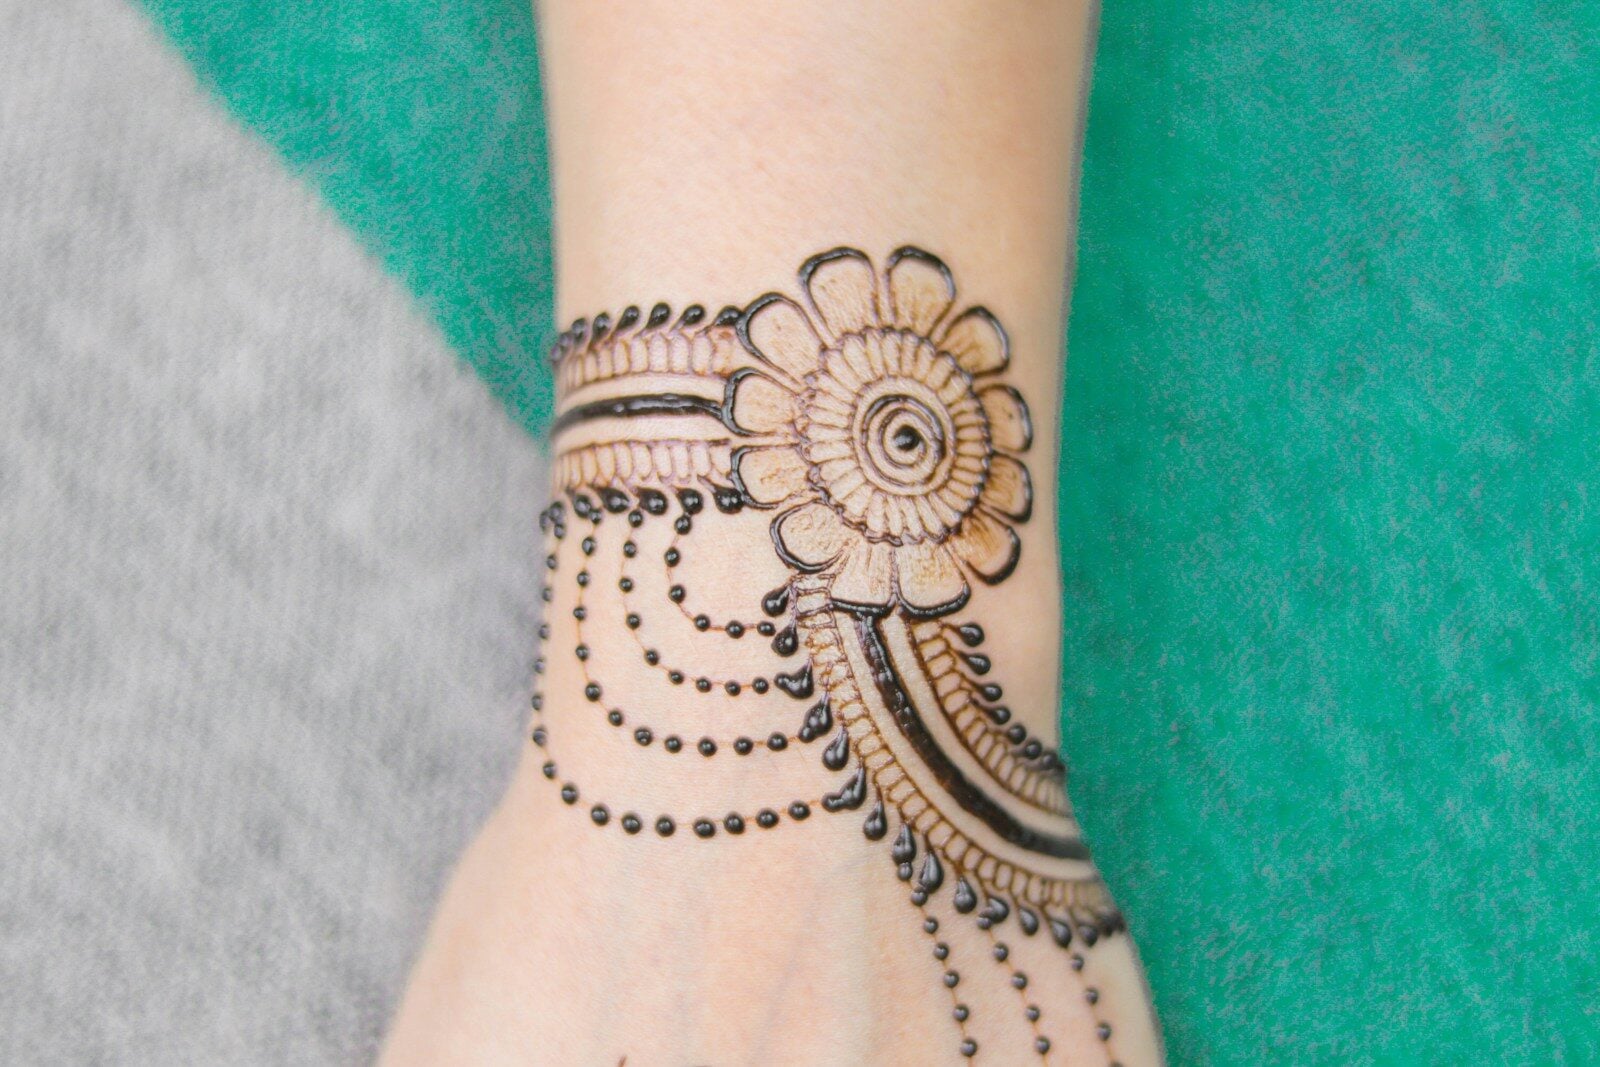
A simple mehndi design focuses on minimalist patterns like floral mandalas, basic lines, and leafy trails that are easy to apply. These designs offer a sophisticated look without the hours of sitting required for traditional bridal henna, making them perfect for beginners and casual celebrations.
Elegant and Simple Mehndi Design Ideas for Every Occasion
Finding a simple mehndi design that looks professional but doesn’t take five hours to apply is a game-changer for anyone who loves henna. Whether you are prepping for a cousin’s wedding, a festive holiday, or you just want to experiment with some body art on a lazy Sunday, the beauty of mehndi lies in its versatility. You don’t need to be a master artist to achieve a stunning result; sometimes, a few well-placed dots and vines make a much stronger style statement than a cluttered, heavy pattern.
Why Minimalism is Winning the Henna Trend
For a long time, the trend was “the fuller, the better.” Brides would have intricate patterns covering their arms up to their elbows. While that’s still a beautiful tradition, there is a massive shift toward “less is more.” A simple mehndi design allows the skin to breathe and highlights the natural shape of your hands. It’s practical for the modern woman who might need to get back to her laptop or chores without worrying about smudging a massive masterpiece.

Essential Elements of Easy Patterns
To create a look that feels balanced, you only need to master a few basic shapes. Once you have these down, you can mix and match them to create something unique.
- The Mandala: A circular motif in the center of the palm. It’s a classic because it’s symmetrical and grounding.
- The Vine (Bail): A diagonal trail that usually starts from the wrist and ends at the tip of the index finger.
- Geometric Accents: Clean lines and small squares that give a contemporary, almost jewelry-like feel.
- Petals and Leaves: The bread and butter of any floral arrangement.
How to Apply a Simple Mehndi Design: A Step-by-Step Guide
If you are doing this for the first time, don’t aim for perfection. Aim for flow. Here is how you can get a clean look on your first try:
- Prep the Canvas: Wash your hands with soap to remove any oils or lotions. Dry them completely. Any residue on the skin can act as a barrier to the dye.
- The Anchor Point: Start with a central element. If you’re doing a back-hand design, place a small flower or a diamond shape right in the middle.
- Build Outward: Add smaller petals or dots around your anchor.
- The Finger Details: Choose one or two fingers to decorate. Usually, repeating the same small pattern on the tips of all fingers creates a cohesive look.
- Let it Set: Leave the paste on for at least 2 to 4 hours. The longer it stays, the deeper the stain.
- The Reveal: Scrape the dried paste off with a blunt edge or your fingernails. Avoid water for the first 12 hours to let the color oxidize into a deep mahogany.
Choosing the Right Pattern for Your Hand Shape
Not every design looks the same on everyone. If you have long, slender fingers, jewelry-style patterns that mimic rings look incredible. If your hands are smaller, a single bold vine running diagonally can help elongate the appearance of your hand.
According to styling experts at Brides, choosing a design that complements your jewelry—like leaving space for a watch or a specific ring—can elevate the entire aesthetic. This approach ensures the henna doesn’t compete with your accessories.
Common Mistakes to Avoid
Even with a simple mehndi design, things can go sideways if you aren’t careful. Here are the most frequent hiccups:
- Holding the cone wrong: Don’t hold it like a pencil at the very tip. Grip it slightly higher to have better control over the pressure.
- Ignoring the flow: Sometimes people get too caught up in one tiny detail and forget to look at the hand as a whole. Step back and check the symmetry.
- Using “Emergency” Henna: Avoid cones that promise instant dark color in 5 minutes. These often contain harmful chemicals like PPD that can cause skin burns. Stick to natural henna.
Comparing Traditional vs. Simple Mehndi Design
| Feature | Traditional / Heavy | Simple / Minimalist |
| Application Time | 2 – 5 Hours | 15 – 30 Minutes |
| Skill Level | Advanced / Professional | Beginner / Intermediate |
| Occasion | Weddings, Major Festivals | Parties, Casual Wear, Eid |
| Stain Coverage | Full hand saturation | High contrast with skin |
Pros and Cons of Going Minimal
Pros
- It dries much faster, reducing the risk of accidental smudges.
- It looks modern and pairs well with Western outfits like jeans and dresses.
- It’s much easier to DIY if you can’t find a professional artist.
Cons
- If a line is crooked, it’s more noticeable because there is less “clutter” to hide it.
- It might feel “incomplete” to those who prefer the traditional, heavy bridal look.
Caring for Your Henna Stain
The longevity of your simple mehndi design depends entirely on aftercare. Once the paste is off, the color will initially be a bright orange. Don’t panic; this is normal. Over the next 24 to 48 hours, it will darken significantly.
To get the best results, apply a mixture of sugar and lemon juice over the dried paste while it’s still on your skin to keep it moist and stuck to the hand. You can also find great historical context and safety tips on henna usage at The Victoria and Albert Museum, which highlights the cultural significance and botanical roots of this ancient art form.
Frequently Asked Questions
How long does a simple mehndi design last?
Typically, the stain lasts between 7 to 14 days. It starts to fade gradually as your skin naturally exfoliates. Factors like how often you wash your hands and the quality of the henna powder play a big role.
Can I use a stencil for a simple design?
Absolutely. If you don’t have a steady hand, stencils are a fantastic tool. You just stick them on, fill in the gaps with paste, wait for it to dry, and peel it off for a perfect result every time.
What is the best way to remove mehndi quickly?
While there is no “instant” eraser, you can speed up the fading process by soaking your hands in warm soapy water, using a salt scrub, or applying a bit of hydrogen peroxide on a cotton ball to lighten the stain.
Is black henna safe for simple designs?
No. Real henna is never black; it is a greenish-brown paste that leaves a reddish-brown stain. “Black henna” usually contains a chemical called PPD (paraphenylenediamine), which can cause severe allergic reactions and permanent scarring.
Does lemon juice really make the stain darker?
Yes, the acidity helps release the dye from the henna leaves, and the sugar in the mixture helps the paste stick to your skin longer. This combination is a staple in traditional application.
Creative Ideas to Try Next
Once you’re comfortable with a basic layout, you can start experimenting with negative space. This is where you outline a shape and fill in the background, leaving the actual design as the natural color of your skin. It’s a striking look that turns the concept of a simple mehndi design on its head.
You could also try “finger-only” designs. Instead of putting anything on your palm, you create intricate patterns just on the tips and joints of your fingers. It’s incredibly chic and looks like permanent lace gloves.
Whatever style you choose, the most important thing is to have fun with it. Henna is an art form meant for celebration and expression.